Learn to Grow Bell Peppers
Looking for a relatively easy-to-grow veggie for your balcony garden, fire escape farm, or patio planters? Even if you just have a few pots or a single raised bed planter, bell peppers are a container-friendly crop for beginning gardeners and garden veterans alike.
Pepper plants are relatively pest- and disease-free. Deer do not find pepper plants particularly pleasing and tend to avoid them unless there is absolutely nothing else around for them to eat. Bell peppers love the heat and a full sun location so plan on planting peppers for the warm growing season or growing them indoors with grow lights during colder months.
|
 TimingPeppers planted outdoors need at least an equivalent of 7+ hours of direct sun [DLI of 21+ mol/m²/day]. |
 Full sunPeppers planted outdoors need at least an equivalent of 7+ hours of direct sun [DLI of 21+ mol/m²/day]. |
 CareGrowing peppers outdoors is beginner friendly. You’ll sprout, thin, prune, and harvest. |
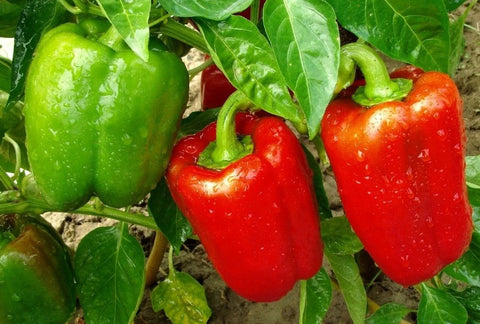
Did you know? Red bell peppers are just ripe green bell peppers! That’s right, you can harvest green bell peppers before the fruits (yes, peppers are technically fruit) ripen, or leave them on the plant to ripen to yellows, oranges, and then finally red when ripe. Green peppers will have a crisper “greener” flavor, whereas ripe red peppers will be sweeter.

Healthy Eating Tip: Bell peppers are a good source of fiber and vitamin C, some vitamin A, and small amount of minerals. Bell peppers also provide several healthy antioxidants, such as capsanthin, violaxanthin, lutein, quercetin, and luteolin.
Our Favorite Bell Peppers
While there are more than 50,000 cultivars of peppers grown around the world, they originate from five major species. Bell pepper cultivars are selected from Capsicum annuum, which also includes cayenne, friggitello, jalapeños, paprika, and serrano pepper cultivars. Bell peppers don't pack the spicy heat that their close cousins do, so if you're looking for a non-spicy mild flavor bell peppers are your pick.
Pepper Factoid: Peppers range in heat from 0 Scoville Heat Units (Bell Pepper) to more than 2,000,000 SHU (Trinidad Moruga Scorpion) - so no matter what your taste preference is - there’s a pepper for you!
While there are many bell pepper cultivars to choose from a great place to start with is America’s favorite heirloom bell pepper, ‘California Wonder’. It’s no wonder why this cultivar has been grown and lived since 1928, with its sturdy plants that produce reliable yields of thick blocky fruit. ‘California Wonder’ boasts big, delicious flavor and sturdy fruits that can be picked green or allowed to ripen to a rich red.
(Insert Product Image Photo/link)
'California Wonder' Characteristics:
- Heirloom, open-pollinated
- Warm Season
- Full Sun (7+ hours/day)
- Plant Height: 18-30"
- Spacing: 12-18”
- Fruit Length: 5”-6”
- Days to Maturity from transplant: 77
- TMV (tobacco mosaic virus) resistant
Grow Bell Peppers Outdoors
Season: Ideal Temperature and Humidity for Bell Peppers
Pepper plants are a warm-season crop and thrive when daytime temperatures are around 70-85°F during the day and 60-70°F at night, with a relative humidity between 40-50%. Plants also prefer warmer temperatures around the root zone. You’ll need to wait until any chance of spring frost is over in your area to direct seed your bell peppers into the garden or containers. If the air or soil temperature are too cold, you may struggle to get your seed to successfully germinate or your seedlings to thrive. Plants can also lose their flowers or fruit when temperatures drop below 40°F.
If you live in a warm climate with a long growing season, you can also continue seeding bell peppers in summer for fall harvest. However, extreme heat in the summer can stunt bell peppers. In very hot climates, bell peppers are great for planting in early spring for summer harvest and summer for fall harvest.
What You'll Need to Direct Seed & Grow Bell Peppers in Outdoor Pots
CONTAINERS: If you're growing in pots, we recommend a container that has a 3-gallon volume. If you plan on growing groups of bell peppers, you can grow them in 5–10-gallon sized containers. You can also grow bell peppers in large self-watering containers or those that have a water reservoir. This is especially beneficial if you live in a hot climate with extreme summer heat and drought. For climates that may not get as hot or dry, 3–5-gallon sized porous grow bags also work great for bell peppers.
POTTING MIX: Outdoor container potting mixes, or mixes labeled for vegetables and herbs, that contain humus/humic acid and some mycorrhizae are preferred for growing bell peppers in pots.
GARDEN BEDS: If you’re direct seeding into garden beds or raised beds, be sure to amend your soil with organic compost and humus or use a complete raised bed mix that contains both.
FERTILIZER: When you grow vegetables in containers it's important to provide supplemental fertilizer. After pepper seedlings have sprouted and produced their first set of true leaves (usually 1-3 weeks), it's time to start feeding them with either a granular or liquid fertilizer.
- To start: Joyful Dirt All Purpose. Higher in Nitrogen (9-1-5)
- Flowering & Fruiting: Vegetable Blend. Joyful Dirt Tomato & Herb (4-9-8)

10 Steps: How to Plant Pepper Seeds in Outdoor Containers
- FILL: Fill up your containers with dry soil from the bag, gently shaking or tapping the pot to slightly settle the potting mix.
- MOISTEN: Moisten the potting mix by watering it until the mix has a uniform damp consistency.
- PLANT: Plant your pepper seeds ¼ inch deep, planting two seeds per hole (to ensure at least one strong seedling). If you’re using larger containers, 5– to 10-gallon size, you can plant several seed sites (about 8-inches apart).
- COVER: Cover seeds with potting mix and gently water again.
- SUN: Place pots in a full-sun location: that means 6-8 hours of direct sun per day. Plants can grow in a less sunny location, but you’ll get much less fruit!
- WATER: Keep soil consistently moist to ensure seed germination. Keep your pepper pots consistently moist through the growing season. While hot peppers can tolerate periods of drying out, bell peppers prefer consistent moisture. Your potting mix should stay the consistency of a wrung-out sponge – not too dry, but not soggy. Keep the soil too wet and you could have problems with root rot.
- GERMINATION: Seeds typically germinate and emerge in 1-2 weeks, but if temperatures are still cool outside it could take longer. Peppers can sometimes take up to several weeks to germinate.
- THIN: If both seeds at each seed site germinate, wait to see how they grow then snip off the smaller weaker one, leaving the one stronger seedling to grow.
- FERTILIZE: After your bell peppers have germinated and produced the first set of true leaves, it’s time to fertilize with your starting nitrogen fertilizer. Apply the fertilizer per the schedule on the label, which is usually weekly or every other week for vegetable crops.
- GROW & HARVEST: After plants begin flowering, you’ll notice tiny fruits developing. You can harvest peppers at any stage of development you’d like, either green or fully red and ripe! Use sharp snips to cut the peduncle (small stem that connects fruit to plant) and harvest the peppers. If you try and pull the pepper off, you may damage the entire plant.
Pruning: Do I Really Need to Prune my Pepper Plants?
Some pepper growers like to “top” their pepper plants, meaning pruning off some of the stem tips, to encourage a lower-growing bushier plant. However, there isn’t always a significant benefit to doing so when it comes to yields. So, it’s up to you whether you want to prune your plants before they start flowering and fruiting. Just keep plants clean of yellow, damaged, or dead foliage and you’ll generally be good to grow!
If plants get top-heavy you can stake them along the main stem for added support.
End of Season
By now we hope you've enjoyed some good bell pepper harvests! Be sure to check out our recipes for ideas on how to use your own homegrown food.
Once temperatures get cold or frost approaches, it will be time to wrap up your outdoor bell pepper season. When plants stop setting fruit or ripening, or plants are killed by a frost, you can remove plants and put them into your composter or compost pile. If you're growing an open-pollinated type of pepper, and it's not mixed with other pepper cultivars, you can always save and store some mature seed before the first frost.
If you want to learn how to get a jump on the planting season by starting your pepper seed transplants indoors keep reading!
NEXT READ: How to Jump Start your Pepper Seedlings Indoors
If you want to learn how to grow peppers from seed to harvest indoors here's your next lesson!
NEXT READ: How to Grow Peppers Indoors Year-Round

There are no comments for this article. Be the first one to leave a message!