Did you know that the average American produces 1704 pounds of garbage per year? Sad, but true. In an effort to keep more of our trash out of landfill, we’ve come up with 5 Eco-Friendly Gardening Projects that use recycled household items. #reduce #reuse #recycle!
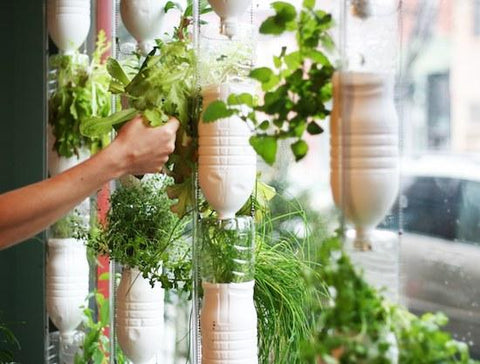
Window Farm
The Window Farm is a functional, space-efficient way to build a vertical garden inside your apartment. It can also be built using a bunch of recycled and repurposed household items. The idea is simple – cut the bottom off a plastic bottle, drill a hole in the lid, turn it upside down, and fill it with a growing medium such as clay pebbles and peat moss or rock wool.
One popular way to irrigate a Window Farm is to use an air pump to lift water up a vertical tube. This method works well, but the bottles can be noisy, and clear air tubes may quickly become lined with green algae.
Recycle these household items for this project:
- Plastic soda or drink bottles
- 4L / 1 Gallon+ tubs of protein powder and other supplements for a reservoir
- Leftover plastic tubs from bakeries or supermarkets used for icing
- Old coat hangers for making hooks to attach the bottles
Bottle Garden (Top Down)
Similar to our own bottle gardens, but with a twist. The DIY version involves cutting a plastic bottle in half, inverting the top piece, and adding wicking material between the two. For the growing medium, you can use soil or clay pebbles (you'll need to add hydroponic nutrients like these). Plastic bottles are easiest to work with, but you can use glass bottles with a glass cutter like this one.

Recycle these household items for this project:
- Plastic or glass bottles, cut in half
- Rope or fabric for wicking
Cans
This might seem obvious, but there’s a right and wrong way to do it. The wrong way is to just fill a can with soil and plant. The right way involves ensuring proper drainage to prevent root rot.

Ensure proper drainage by:
- Punching 3 or 4 holes in the bottom of the can for outdoor use.
- Including internal drainage with a layer of charcoal and small stones or river pebbles for indoor use.
Recycle these household items for this project:
- Fruit, vegetable, or bean cans; tomato sauce cans work great, especially with basil.
Take-Out Containers
Plastic take-out containers are great for the garden. They are rigid, waterproof, and often transparent, making them ideal for seed starting. The lid traps moisture, creating a humid environment perfect for sprouting seeds. Once seedlings are established, the container can act as a drip catcher or reservoir.

Recycle these household items for this project:
- Plastic take-out containers with lids
- Plastic food containers from supermarkets (e.g., lettuce or bakery items)
Bottle Garden (Top-Up)
This method involves using dark green or brown bottles to filter out algae-causing light frequencies, keeping the water cleaner. This setup is great for passive hydroponics.

Recycle these household items for this project:
- Dark green or brown bottles (16-32 oz)
We hope one of these ideas inspires you to start your own DIY gardening project using recycled materials. Ready to get started? Use code RECYCLE to enjoy 10% off any of our bottle garden kits today.

There are no comments for this article. Be the first one to leave a message!